I would like to do some validation part before cancelling the Sales Order. I have created a plug-In for adding validation and calling this plug-In when "Cancel Order" button clicked. If the validation is not satisfied, I am throwing an error message by throwing an exception. It's working fine. But the "Cancel Order" dialog box is opening when clicking "Cancel Order". Eventhough it's throwing error message, if I closed error message, the dialog box still open only. They can able to "Cancel Order". Before "Confirm" the cancel order, whether can I integrate order cancelling.
↧
How to integrate the validation before cancel the sales order
↧
Talking to Dynamics CRM Online thru Web API
I'm trying to create a new contact (proof of concept) thru web api, but om getting 401 Unauthorized. I'll post my code below:
try
{
    var jsonStr = "{ \"firstname\": \"Test\", \"lastname\":\"API\" }";

    string username = "lars@foo.onmicrosoft.com";
    string password = "qwert1234";
    string domain = "foo.onmicrosoft.com";
    string baseAddress = "https://foo.crm4.dynamics.com";

    byte[] credentialBuffer = new UTF8Encoding().GetBytes(username + ":" + password);

    var request = (HttpWebRequest)WebRequest.Create(baseAddress + "/api/data/v9.1/contacts");
    request.Method = "POST";
    request.ContentType = "application/json";
    request.Headers.Add("Authorization", "Basic " + Convert.ToBase64String(credentialBuffer));
    request.Headers.Add("OData-MaxVersion", "4.0");
    request.Headers.Add("OData-Version", "4.0");

    using (var stream = request.GetRequestStream())
    {
        var jsonStrBytes = Encoding.ASCII.GetBytes(jsonStr);

        stream.Write(jsonStrBytes, 0, jsonStrBytes.Length);
    }

    var response = (HttpWebResponse)request.GetResponse();

    var responseString = new StreamReader(response.GetResponseStream()).ReadToEnd();
}
catch (Exception ex)
{ }
But from this I get 401 Unauthorized. This is Dynamics CRM Online and my user is a 365 user. What am I missing here?
↧
↧
D365 Developer Extensions
I am trying to install D365 Developer Extensions for CRM dynamics plug-in projects. As this is not published Microsoft, our IT security does not allow us to use this. Do you have any workaround/Microsoft authorized extensions that I can use.
marketplace.visualstudio.com/items
Thanks,
Raj
↧
can i set CRM to log automatically at same time evry day
I want to know if we can set the application to log in CRM at the same time everyday
↧
Use Xrm.WebApi in a stand alone Web Resource
I ran into this issue working on the last update to CRM REST Builder when adding the Xrm.WebApi functionality. Note this won’t effect you if you’ve got a web resource embedded in a form.
Attempting to execute a simple retrieve for example:
Unexpected token u in JSON at position 0
What does that even mean? I bit of searching and I ran across this Stack Overflow question. So it seems Xrm.WebApi is looking for a variable which maps entity names with their corresponding entityset names. Easy fix since I had all the data so I dynamically built a variable with all the mappings which looked a bit like this (you only need to add the entities you're working with):
Attempting to execute a simple retrieve for example:
Xrm.WebApi.online.retrieveRecord("account"…And I was greeted with this error:Unexpected token u in JSON at position 0
What does that even mean? I bit of searching and I ran across this Stack Overflow question. So it seems Xrm.WebApi is looking for a variable which maps entity names with their corresponding entityset names. Easy fix since I had all the data so I dynamically built a variable with all the mappings which looked a bit like this (you only need to add the entities you're working with):
window["ENTITY_SET_NAMES"] = ['{"account":"accounts", "contact":"contacts"}'];Got further along and started working implementing actions and functions and ran into the same error once again, WTF. After some tedious debugging through the Microsoft code I found there is another dependency on a similar variable. This one maps entities to their primary id fields. So I added something like this with all these mappings:window["ENTITY_PRIMARY_KEYS"] = ['{"account":"accountid", "contact":"contactid"}'];After that my problems were solved.↧
↧
Dynamics 365 Trial
Hi,
Hopefully someone can help - I have registered for a Dynamics 365 trial version - I was hoping to explore creating workflows etc - but I am not an administrator so can't do this. When I try to update my user it fails. Can anyone help.
thanks
Steven
↧
How to extend the timeout on preview when hovering over fields in IE11?
Is there any way to extend the period a field's contents (ie not Label/Description) are displayed on mouseover please? We use CRM 2013 on premises via IE 11. Currently the preview fades after around 5 seconds. I would like to extend this to 30 seconds or even better make it unlimited. I note it is unlimited via Chrome 61. Thanks.
↧
Azure DevOps D365 Build & Test Agent Using An Azure Container Instance – Part 1
What was I hoping to accomplish by doing this?
The goal was to create a build server that could be used to build and test things developed for Dynamics 365 CE. So that means being able to build and test .NET based plug-ins / workflows, JavaScript / TypeScript, run EasyRepro / Selenium UI tests, and be able to deploy as needed. All that, plus be faster because I’m impatient.
Containers at a high level
In my eyes a container falls nicely in between. Using Azure to run the container you’ll end up paying for storage space for the images which will certainly be more than a Function but probably not more than a VM. A Function and a VM both bill based on compute time. The big different is that when a Function isn’t actually processing something it’s shut off and not adding to the bill. A VM on the other hand is accruing compute time as long as it’s turned on, whether it’s doing work or not. The pricing model for a container is closer to that of a VM but the rates appear to be cheaper and costs are calculated per second as opposed to per hour. Turning things on and off to reduce costs is more suited to containers as they can often be up and running in a few seconds while a VM could easily take a minute or more to full start up and get itself into a state where application can run.
To get an idea of the costs here’s what this is costing to run:
- Azure Container Registry (Standard) – ~3GB of storage used = $.67 / day
- Azure Container Instance (Windows 2 vCPU & 2GB) - $3.11 / when running all day
Management is easier using a container versus a VM. On the VM there is the worry about patching and all the possible ways someone could hack in because of the various services running, open ports, etc. Windows based containers don’t run a full blow copy of the OS but rather a scaled down version (Nano Server or Windows Server Core) based on a specific build of the full OS. Less features, less chance for someone to exploit something. The other point is that these operating systems aren’t made to be patched in the traditional sense of running Windows Update. When it’s time to update you’re basically installing whatever components again from scratch on top of a new version of the OS image. Sounds painful but it’s really not once you’ve got the scripting in place (but up until that point it is very painful).
For more on containers: https://www.docker.com/resources/what-container
Plug-in compile & unit test build time comparison
| Hosted VS2017 Agent | |
| Task | Time |
| Queue time | 1s |
| Prepare job | <1s |
| Initialize agent | <1s |
| Initialize job | 7s |
| Checkout | 14s |
| NuGet Restore | 1m 7s |
| MSBuild - Build Solution | 54s |
| Visual Studio Test Platform Installer | 8s |
| VsTest – Execute Unit Tests | 35s |
| Publish – Test Results | 5s |
| Post-job: Checkout | <1s |
| Report build status | <1s |
| Total | 3m 14s |
| Private Agent Azure Container Service | |
| Task | Time |
| Queue time | 1s |
| Prepare job | <1s |
| Initialize agent | N/A |
| Initialize job | <1s |
| Checkout | 3s |
| Command Line Script - NuGet Restore | 4s |
| MSBuild - Build Solution | 8s |
| Visual Studio Test Platform Installer | 2s |
| VsTest – Execute Unit Tests | 14s |
| Publish – Test Results | 4s |
| Post-job: Checkout | <1s |
| Report build status | <1s |
| Total | 38s |
So what are the differences?
Both were 1 second when only running 1 build at a time. Each agent can only run 1 job at a time by default without getting into parallel builds, multiple agents, etc. When you start lining up multiple builds back-to-back the queue times on the hosted agent are going to be considerably longer.
Initialize Agent
Not applicable for privately hosted agents.
NuGet Restore
These packages needed to be restored for the test I ran:
- FakeItEasy
- FakeXrmEasy.9 (@jordimontana)
- Microsoft.CrmSdk.CoreAssemblies
- Microsoft.CrmSdk.Deployment
- Microsoft.CrmSdk.Workflow
- Microsoft.CrmSdk.XrmTooling.CoreAssembly
- Microsoft.IdentityModel.Clients.ActiveDirectory
- MSTest.TestAdapter
- MSTest.TestFramework
On the container I pre-installed NuGet.exe so instead of using the NuGet build task I used a Command Line Script task and executed something like:
"C:\Program Files\NuGet\nuget.exe" restore $(Build.SourcesDirectory)\TestPlugins.sln -Verbosity Detailed –Noninteractive
After the first run of this build, all those packages were cached locally and available so it took only 4 seconds.
MSBuild - Build Solution
I couldn’t find anything referencing the specifications for the hosted servers. The Azure Container Instance had 2 vCPUs and 2 GB of memory. I suspect that’s more than gets assigned to the hosted agents and as a result the build time is considerably faster.
Visual Studio Test Platform Installer
This is an out of the box build task which installs VSTest.Console.exe needed to run .NET unit tests. In hindsight this step probably wasn’t needed on the hosted agent since it’s already installed by default.
I spent a fair amount of time trying to get this installed on the container image without success. Again in hindsight it would have been easier to install a full copy a Visual Studio 2017 (which would have included this) instead of trying to install the bare minimum number of components I thought I’d need for a capable D365 build & test server. The flip side though is the container image becomes larger, more costly, and more cumbersome to deal with. The bright side is that once it’s installed it’s available for future use without re-downloading and re-installing. The build task is smart like that and first checks if it’s there before blindly installing. That 2 seconds was just to check if it was installed. The bigger reason I wanted to get it installed was to simplify and reduce the number of steps a person would need to go though to create a build. It’s just one more thing for someone new coming in to forget and have to waste time on because the tests won’t run.
VsTest – Execute Unit Tests
I again attribute the difference to the virtual hardware specs likely being better.
Part 2 will cover what went into the creating the container.
↧
Azure DevOps D365 Build & Test Agent Using An Azure Container Instance – Part 2
In Part 1 I covered the reasoning for choosing a container and the performance gains that resulted in the build process.
Remember the goal was to create a build server that could be used to build and test things developed for Dynamics 365 CE. So that means being able to build and test .NET based plug-ins / workflows, JavaScript / TypeScript, run headless EasyRepro / Selenium UI tests, and be able to deploy as needed. Here’s what I came up with. I’m sure it’s probably not the best or cleanest way of going about this, but it works.
Image Creation Basics
As you can see, to get software above and beyond what comes on the base OS image you need to write PowerShell or DOS commands to obtain and install.
When looking through the script and you see this, that means the follow commands are executed in PowerShell.
SHELL ["powershell", "-Command", "$ErrorActionPreference = 'Stop'; $ProgressPreference = 'SilentlyContinue';"]
When you see this, that means the follow commands are executed at the Windows command prompt.
SHELL ["cmd", "/S", "/C"]
Everything that get executed starts off with RUN (environment variables are ENV) and you’ll notice that multiple commands are chained together to execute in one batch. The reasoning for this is due to the way Docker assembles or layers the images. Each RUN command creates a new layer on top of the OS with the changes made. Layers are cached for reuse as the image is assembled. The more items you can group together, the less layers you end up with. This can be a good or bad thing.
If there’s a failure building the image on a particular layer, instead of starting over from the beginning (and potentially wasting a lot of time) it will used the cached layers and start again at the one that failed. If the failure happens in the middle of 12 items chained together, it will have to start over at the first item in that layer. If you successfully create an image and then make a change someplace in the middle, it will use the cached images prior to the change but then need to re-perform all the actions on subsequent layers as that change might effect them. As such, it’s better to put the items that will change the least first and then work your way up toward ones that might get versioned more frequently. If I revise this image I’ll probably put more thought into that and reorder some things.
Some of these commands aren’t easy to test and escaping characters combined with environment variables and file paths with spaces in them gets pretty confusing. I ended up doing a lot of trial and error to get some of those combinations correct which was frustrating but it would have been even worse had the image creation needed to start from scratch each time.
Base image
I ended up using this image: microsoft/dotnet-framework:4.7.2-runtime-windowsservercore-ltsc2016
I had originally picked a later build of Windows Server Core but when I went to deploy to the Azure Container Registry (ACR) I found out that it doesn’t support that version of the image so I had to start all over with this image. ACR only supports Long-Term Servicing Channel (LTSC) versions of Windows. LTSC being versions of Windows that will be supported for 5 years and then have 5 additional years of extended support. It should also be mentioned that you don’t need to acquire the base OS for the container if you’re using something from a public repository. If you are using Docker to build the image, it will automatically download the image for you to use. This could be just an OS, or an OS with software already installed. In that case buyer beware I suppose. As far as licensing is concerned, Windows 10 allows you to run containers for development purposes. For production use, the Windows Server license of the host covers containers. I’m assuming then if you’re running the container in Azure, licensing is also covered.
NuGet
Downloads and installs NuGet.exe so we don’t have to use the Azure DevOps NuGet build task later.
Visual Studio Build Tools & Web Targets
This downloads and installs the Visual Studio test agent, base build tools, and the specialized build tool packages for the different things related to Dynamics 365 CE we might want to build. It also removes the install files once complete. You’ll notice it’s installing the test agent but it doesn’t seem to be compatible with what is required for running tests from Azure DevOps. What it does do is ensure the agent reports to Azure DevOps the test agent is installed to satisfy build task demands. If the agent doesn’t show it meets the demands or requirements needed to run the build, it won’t even start. You could skip this and manually edit the list of demands for the agent in Azure DevOps, but the downside is that you’d need to do it for every hostname the container gets. When you stop and start a container it receives a new and different hostname which then shows up separately in the list of build agents. Not a big deal but after awhile you’ll end up with a long list of dead agents that will need to be manually deleted. There’s probably an API someplace for that but the ideal solution would be to figure out a way to set or keep the same hostname each time. That might not be possible considering you can start any number of container instances and having the same name probably wouldn’t fly.
Path Variables
So things like NuGet can be executed from anyplace in the file system.
.NET Targeting Packs
For building against different versions of the .NET Framework.
Build Agent
This installs the build agent software so the container can communicate with Azure DevOps. This url comes from Agent Pools page.
PowerShell Modules
This sets up NuGet.org as a package provider and installs the Azure and Dynamics 365 CE specific PowerShell modules we might need later. Having these pre-installed should prevent the need to import them each time in scripts requiring them.
Suppress Error Dialogs
Not sure this is 100% necessary but these registry entries should prevent Windows error dialogs which might hang something up.
Chocolatey Installs
Downloads and installs Chocolatey which then can be used to download other software packages. In this case Git, Node.js, and the Azure CLI. If you aren’t familiar with Chocolatey it’s package management for applications. Lots of commonly used software can be installed and updated from here via script.
NPM Installs
Grunt and gulp task runners.
Google Chrome Install
I tried installing Chrome via Chocolatey but ended up having problem getting it to work. It’s hard to say if that version was the issue or if something else might have been wrong with the image during the testing. Once installed it appears to be v71 which is the latest while I’m writing this. I’m not 100% sure what’s special about the version that comes from the url I’m using but it seems to be used widely across the internet for silent installs. I should also point out that EasyRepro currently supports v2.38 of the Selenium Chrome driver. That version only lists official support for Chrome v65 – 67. So maybe it’s just luck that it works and this is an unsupported set up. I tried updating the Chrome driver to a version which supports the latest Chrome browser version and then had issues running the tests. Since that’s all kind of a mess I’d recommend just sticking to a known working combination like this.
Creating the container image
I’m not the first person to think of using a container for an Azure DevOps build agent by any means. There are a number of people who’ve blogged about it and you can get pre-configured, Microsoft created Azure DevOps agent Dockerfiles from Docker Hub. The problem with what’s on Docker Hub and most of the blogs is that most everything is Linux. Fine if you want to build .NET Core projects but Dynamics 365 CE needs the regular .NET Framework which isn’t going to run on Linux. From what I could see, Microsoft doesn’t have a Windows based agent on Docker Hub so I set off to build my own.Remember the goal was to create a build server that could be used to build and test things developed for Dynamics 365 CE. So that means being able to build and test .NET based plug-ins / workflows, JavaScript / TypeScript, run headless EasyRepro / Selenium UI tests, and be able to deploy as needed. Here’s what I came up with. I’m sure it’s probably not the best or cleanest way of going about this, but it works.
Dockerfile
start.cmd
start.ps1
Dockerfile
As you can see, to get software above and beyond what comes on the base OS image you need to write PowerShell or DOS commands to obtain and install.
When looking through the script and you see this, that means the follow commands are executed in PowerShell.
SHELL ["powershell", "-Command", "$ErrorActionPreference = 'Stop'; $ProgressPreference = 'SilentlyContinue';"]
When you see this, that means the follow commands are executed at the Windows command prompt.
SHELL ["cmd", "/S", "/C"]
Everything that get executed starts off with RUN (environment variables are ENV) and you’ll notice that multiple commands are chained together to execute in one batch. The reasoning for this is due to the way Docker assembles or layers the images. Each RUN command creates a new layer on top of the OS with the changes made. Layers are cached for reuse as the image is assembled. The more items you can group together, the less layers you end up with. This can be a good or bad thing.
If there’s a failure building the image on a particular layer, instead of starting over from the beginning (and potentially wasting a lot of time) it will used the cached layers and start again at the one that failed. If the failure happens in the middle of 12 items chained together, it will have to start over at the first item in that layer. If you successfully create an image and then make a change someplace in the middle, it will use the cached images prior to the change but then need to re-perform all the actions on subsequent layers as that change might effect them. As such, it’s better to put the items that will change the least first and then work your way up toward ones that might get versioned more frequently. If I revise this image I’ll probably put more thought into that and reorder some things.
Some of these commands aren’t easy to test and escaping characters combined with environment variables and file paths with spaces in them gets pretty confusing. I ended up doing a lot of trial and error to get some of those combinations correct which was frustrating but it would have been even worse had the image creation needed to start from scratch each time.
Base image
I ended up using this image: microsoft/dotnet-framework:4.7.2-runtime-windowsservercore-ltsc2016
I had originally picked a later build of Windows Server Core but when I went to deploy to the Azure Container Registry (ACR) I found out that it doesn’t support that version of the image so I had to start all over with this image. ACR only supports Long-Term Servicing Channel (LTSC) versions of Windows. LTSC being versions of Windows that will be supported for 5 years and then have 5 additional years of extended support. It should also be mentioned that you don’t need to acquire the base OS for the container if you’re using something from a public repository. If you are using Docker to build the image, it will automatically download the image for you to use. This could be just an OS, or an OS with software already installed. In that case buyer beware I suppose. As far as licensing is concerned, Windows 10 allows you to run containers for development purposes. For production use, the Windows Server license of the host covers containers. I’m assuming then if you’re running the container in Azure, licensing is also covered.
NuGet
Downloads and installs NuGet.exe so we don’t have to use the Azure DevOps NuGet build task later.
Visual Studio Build Tools & Web Targets
This downloads and installs the Visual Studio test agent, base build tools, and the specialized build tool packages for the different things related to Dynamics 365 CE we might want to build. It also removes the install files once complete. You’ll notice it’s installing the test agent but it doesn’t seem to be compatible with what is required for running tests from Azure DevOps. What it does do is ensure the agent reports to Azure DevOps the test agent is installed to satisfy build task demands. If the agent doesn’t show it meets the demands or requirements needed to run the build, it won’t even start. You could skip this and manually edit the list of demands for the agent in Azure DevOps, but the downside is that you’d need to do it for every hostname the container gets. When you stop and start a container it receives a new and different hostname which then shows up separately in the list of build agents. Not a big deal but after awhile you’ll end up with a long list of dead agents that will need to be manually deleted. There’s probably an API someplace for that but the ideal solution would be to figure out a way to set or keep the same hostname each time. That might not be possible considering you can start any number of container instances and having the same name probably wouldn’t fly.
Path Variables
So things like NuGet can be executed from anyplace in the file system.
.NET Targeting Packs
For building against different versions of the .NET Framework.
Build Agent
This installs the build agent software so the container can communicate with Azure DevOps. This url comes from Agent Pools page.
PowerShell Modules
This sets up NuGet.org as a package provider and installs the Azure and Dynamics 365 CE specific PowerShell modules we might need later. Having these pre-installed should prevent the need to import them each time in scripts requiring them.
Suppress Error Dialogs
Not sure this is 100% necessary but these registry entries should prevent Windows error dialogs which might hang something up.
Chocolatey Installs
Downloads and installs Chocolatey which then can be used to download other software packages. In this case Git, Node.js, and the Azure CLI. If you aren’t familiar with Chocolatey it’s package management for applications. Lots of commonly used software can be installed and updated from here via script.
NPM Installs
Grunt and gulp task runners.
Google Chrome Install
I tried installing Chrome via Chocolatey but ended up having problem getting it to work. It’s hard to say if that version was the issue or if something else might have been wrong with the image during the testing. Once installed it appears to be v71 which is the latest while I’m writing this. I’m not 100% sure what’s special about the version that comes from the url I’m using but it seems to be used widely across the internet for silent installs. I should also point out that EasyRepro currently supports v2.38 of the Selenium Chrome driver. That version only lists official support for Chrome v65 – 67. So maybe it’s just luck that it works and this is an unsupported set up. I tried updating the Chrome driver to a version which supports the latest Chrome browser version and then had issues running the tests. Since that’s all kind of a mess I’d recommend just sticking to a known working combination like this.
Start.cmd
Just used to run start.ps1.Start.ps1
This is used to configure and start the build agent when the container starts. I pulled this from the blog which is noted at the top. This needs your Azure DevOps instance name and a Personal Access Token (PAT) in order to connect to your agent pool. I’m sure there is probably a better way of handling those values other than hard-coding them into this file, I just haven’t had a chance to look for it yet.Conclusion
I’m glad I took the time to work through setting up a container because I learned a lot. I’m also glad I wrote these 2 blogs, when digging into the how’s and why’s I learned a lot more.↧
↧
Azure DevOps D365 Build & Test Agent Using An Azure Container Instance – Part 3
Part 1 covered the reasoning for choosing a container and the performance gains that resulted in the build process.
Part 2 reviewed the components that were chosen to be installed to support the build process.
Download & install Docker Desktop for Windows– you’ll need to create an account on Docker Hub before it will let you download. Select the option to use Windows containers (if you miss it you can switch later) during the install. When that’s done start it up and log in with your Docker ID. When you see it running in the system tray, right-click and see if any of the menu items say “Switch to Windows containers”. If so, select that. Either it doesn’t get set correctly during install or it’s doing something else that I’m unaware of.
If you want to create the image I was using, download the 3 files from Part 2 or get updated copies from the GitHub repo and put them in a folder. Edit start.ps1 with your Azure DevOps instance name and Personal Access Token.
Open a PowerShell prompt as Administrator and navigate to the new folder.
If you don’t want to use layers from the cache for whatever reason you can disable the cache by adding the no-cache option.
Prior to doing this I’d recommend that if you are on a laptop or have power saving options enabled, you might want to adjust so that your machine doesn’t go to sleep while this is running. That seems to hang the process up and you’ll need to restart from the point at which that happened. If it does happen to stop, you can restart from where you left off by running the same command (with cache enabled). If you make changes prior to restarting, the process will start at the lowest level that was changed.
You should see it start downloading the different parts of the Windows Server image and then starting running through the installation steps defined in the Dockerfile. This process is going to take awhile the first time through since it’s going to download close to 6GB. Once it’s downloaded the base OS image will be cached for future use. Keep in mind as well all the items getting installed need to be downloaded so you might as well grab a coffee and come back because it’s going to be running for awhile.
When that finishes we now have an image that can be used in a container.
Now that container instance is created you can use the start and stop commands to turn it on or off.
If you want to access the filesystem of the running container use this command and you will be dropped into a PowerShell session in the container. This is good for verifying things got installed properly in case the logs during the build process don’t provide enough information.
Use the exit command to end the session. Be mindful of which filesystem you’re in, it’s easy to forget at times which you are connected to.
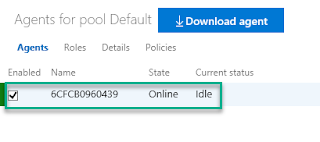
If you’ve provided the correct Azure DevOps information, you should be able to check the available agents and see your container. If you don’t specify an agent pool name in start.ps1, it will go into the default pool. Now when run a build and specify this agent pool it will run on your local machine.
![]()
At this point you can go through the process of setting up GitHub integration and build your image in Azure but I’m just going to upload the one from my local machine that I’ve already created.
Again open a PowerShell prompt as Administrator and navigate to the folder with your Dockerfile.
First you’ll need to log into the Azure Container Registry with this command replacing MyRegistry & AccessKey with the appropriate values from Settings –> Access Keys.
Next tag your local image for the Azure Container Registry with this command. It’s pointing at the local image we created earlier and it’s going to be placing it into a repository named “d365/d365agent”. The first “d365” acts as a namespace to categorize different images.
Then use this command to upload the image.
It will need to upload all the image layers so again there will be some waiting involved.
Make sure you choose Windows as the OS type since it’s not the default. Use at least 2 GB of memory and I’d try for 2 processor cores. You might be able to get away with 1 if you aren’t using EasyRepro. When I tried to run those tests with just 1 core it consistently failed. Take note of which Resource Group you use as you’ll need to go there to manage the container instance once it’s created.
Once that starts you can sit back once again and wait while the container is provisioned.
Once that’s finished you should see something like this in Azure DevOps.
![]()
If you aren’t actively doing anything with the container instance I’d shut it down to save money.
Part 2 reviewed the components that were chosen to be installed to support the build process.
Setup
Maybe a little bit out of order but this is going to focus on getting up and running with containers on Windows. Again there’s almost certainly different ways but this is what I ended up doing.Download & install Docker Desktop for Windows– you’ll need to create an account on Docker Hub before it will let you download. Select the option to use Windows containers (if you miss it you can switch later) during the install. When that’s done start it up and log in with your Docker ID. When you see it running in the system tray, right-click and see if any of the menu items say “Switch to Windows containers”. If so, select that. Either it doesn’t get set correctly during install or it’s doing something else that I’m unaware of.
If you want to create the image I was using, download the 3 files from Part 2 or get updated copies from the GitHub repo and put them in a folder. Edit start.ps1 with your Azure DevOps instance name and Personal Access Token.
Open a PowerShell prompt as Administrator and navigate to the new folder.
Building the image
Here’s the command to start building the container. The period at the end is part of the command. The “-t” flag allows you to assign a name of your choosing and a tag like a version number to the image. The “-m” flag here is capping memory use to 2GB. This configuration will used any cached layers in the process to save time.docker build -t d365agent:v1.1 -m 2GB .If you don’t want to use layers from the cache for whatever reason you can disable the cache by adding the no-cache option.
docker build –no-cache -t d365agent:v1.1 -m 2GB .Prior to doing this I’d recommend that if you are on a laptop or have power saving options enabled, you might want to adjust so that your machine doesn’t go to sleep while this is running. That seems to hang the process up and you’ll need to restart from the point at which that happened. If it does happen to stop, you can restart from where you left off by running the same command (with cache enabled). If you make changes prior to restarting, the process will start at the lowest level that was changed.
You should see it start downloading the different parts of the Windows Server image and then starting running through the installation steps defined in the Dockerfile. This process is going to take awhile the first time through since it’s going to download close to 6GB. Once it’s downloaded the base OS image will be cached for future use. Keep in mind as well all the items getting installed need to be downloaded so you might as well grab a coffee and come back because it’s going to be running for awhile.
When that finishes we now have an image that can be used in a container.
Creating and running a local container instance
You can create a new container instance using this image on your local machine using the following command. We’re telling it to automatically restart in case it gets shut down, specifying some names, and finally telling which image to use.docker run -it -d --restart always --name "d365agent" --hostname "d365agent" d365agent:v1.1Now that container instance is created you can use the start and stop commands to turn it on or off.
docker start d365agentdocker stop d365agentIf you want to access the filesystem of the running container use this command and you will be dropped into a PowerShell session in the container. This is good for verifying things got installed properly in case the logs during the build process don’t provide enough information.
docker exec -it d365agent powershellUse the exit command to end the session. Be mindful of which filesystem you’re in, it’s easy to forget at times which you are connected to.
If you’ve provided the correct Azure DevOps information, you should be able to check the available agents and see your container. If you don’t specify an agent pool name in start.ps1, it will go into the default pool. Now when run a build and specify this agent pool it will run on your local machine.

Creating an Azure Container Registry
Next you’ll want to create an Azure Container Registry which will be private by default. There aren’t many options to pick from so I’m not going to cover it. If you want screenshots refer to the quickstart. The only special option I picked was to enable the Admin User. All that does is allow you to use the registry name as the username when publishing images. In reality you maybe wouldn’t want to do that for a production instance seeing as if someone figure out your registry name they would also then have the username leaving only the password to figure out. Unlikely but anything is possible. Otherwise it’s an individual login or service principal.At this point you can go through the process of setting up GitHub integration and build your image in Azure but I’m just going to upload the one from my local machine that I’ve already created.
Again open a PowerShell prompt as Administrator and navigate to the folder with your Dockerfile.
First you’ll need to log into the Azure Container Registry with this command replacing MyRegistry & AccessKey with the appropriate values from Settings –> Access Keys.
docker login MyRegistry.azurecr.io -u MyRegistry -p AccessKeyNext tag your local image for the Azure Container Registry with this command. It’s pointing at the local image we created earlier and it’s going to be placing it into a repository named “d365/d365agent”. The first “d365” acts as a namespace to categorize different images.
docker tag d365agent:v1.1 MyRegistry.azurecr.io/d365/d365agent:v1.1Then use this command to upload the image.
docker push MyRegistry.azurecr.io/d365/d365agent:v1.1It will need to upload all the image layers so again there will be some waiting involved.
Creating an Azure Container Instance
The only thing left to do is create an Azure Container Instance from the image. If you navigate to Repositories you will see “d365/d365agent”. If you drill in further you’ll see the initial version of the container image. From there you’ll have a Run Instance option. Once again the steps are pretty simple but if you want the visuals check out the quickstart.Make sure you choose Windows as the OS type since it’s not the default. Use at least 2 GB of memory and I’d try for 2 processor cores. You might be able to get away with 1 if you aren’t using EasyRepro. When I tried to run those tests with just 1 core it consistently failed. Take note of which Resource Group you use as you’ll need to go there to manage the container instance once it’s created.
Once that starts you can sit back once again and wait while the container is provisioned.
Once that’s finished you should see something like this in Azure DevOps.
If you aren’t actively doing anything with the container instance I’d shut it down to save money.
↧
Get Latest Solution Patch Name With PowerShell
Someone might find this useful if trying to move solutions around using Azure DevOps & PowerShell. I wanted to automate export of the latest solution patch using the Microsoft.Xrm.Data.Powershell library as part of a build pipeline. It’s pretty straightforward but it requires the solution name, simple for the base solution but when dealing with a patch it’s not possible to predict what the name is going be in order to build it into your script.
I came up with this. Given a solution uniquename this sets build variables for the uniquename & version of the latest patch of a solution or the base solution's uniquename & version if no patches exist.
↧
How to get Client ID and Client Secret Key in CRM 2016?
I have created Online Dynamics 365 30 days trial version.
I want Client ID and Client Secret Key to call Web API using OAuth 2.0. How to get them?
↧
looking for a tool to run to have it check for depreciated client api
I am currently on CRM 2016 and I read that some APIs are being depreciated when upgrading to 365. Is there a tool that I can run to have it check all of my scripts for those depreciated APIs instead of going through them individually?
Thank you.
↧
↧
How to integrate the validation before cancel the sales order
I would like to do some validation part before cancelling the Sales Order. I have created a plug-In for adding validation and calling this plug-In when "Cancel Order" button clicked. If the validation is not satisfied, I am throwing an error message by throwing an exception. It's working fine. But the "Cancel Order" dialog box is opening when clicking "Cancel Order". Eventhough it's throwing error message, if I closed error message, the dialog box still open only. They can able to "Cancel Order". Before "Confirm" the cancel order, whether can I integrate order cancelling.
↧
Talking to Dynamics CRM Online thru Web API
I'm trying to create a new contact (proof of concept) thru web api, but om getting 401 Unauthorized. I'll post my code below:
try
{
    var jsonStr = "{ \"firstname\": \"Test\", \"lastname\":\"API\" }";

    string username = "lars@foo.onmicrosoft.com";
    string password = "qwert1234";
    string domain = "foo.onmicrosoft.com";
    string baseAddress = "https://foo.crm4.dynamics.com";

    byte[] credentialBuffer = new UTF8Encoding().GetBytes(username + ":" + password);

    var request = (HttpWebRequest)WebRequest.Create(baseAddress + "/api/data/v9.1/contacts");
    request.Method = "POST";
    request.ContentType = "application/json";
    request.Headers.Add("Authorization", "Basic " + Convert.ToBase64String(credentialBuffer));
    request.Headers.Add("OData-MaxVersion", "4.0");
    request.Headers.Add("OData-Version", "4.0");

    using (var stream = request.GetRequestStream())
    {
        var jsonStrBytes = Encoding.ASCII.GetBytes(jsonStr);

        stream.Write(jsonStrBytes, 0, jsonStrBytes.Length);
    }

    var response = (HttpWebResponse)request.GetResponse();

    var responseString = new StreamReader(response.GetResponseStream()).ReadToEnd();
}
catch (Exception ex)
{ }
But from this I get 401 Unauthorized. This is Dynamics CRM Online and my user is a 365 user. What am I missing here?
↧
D365 Developer Extensions
I am trying to install D365 Developer Extensions for CRM dynamics plug-in projects. As this is not published Microsoft, our IT security does not allow us to use this. Do you have any workaround/Microsoft authorized extensions that I can use.
marketplace.visualstudio.com/items
Thanks,
Raj
↧
can i set CRM to log automatically at same time evry day
I want to know if we can set the application to log in CRM at the same time everyday
↧
↧
Use Xrm.WebApi in a stand alone Web Resource
I ran into this issue working on the last update to CRM REST Builder when adding the Xrm.WebApi functionality. Note this won’t effect you if you’ve got a web resource embedded in a form.
Attempting to execute a simple retrieve for example:
Unexpected token u in JSON at position 0
What does that even mean? I bit of searching and I ran across this Stack Overflow question. So it seems Xrm.WebApi is looking for a variable which maps entity names with their corresponding entityset names. Easy fix since I had all the data so I dynamically built a variable with all the mappings which looked a bit like this (you only need to add the entities you're working with):
Attempting to execute a simple retrieve for example:
Xrm.WebApi.online.retrieveRecord("account"…And I was greeted with this error:Unexpected token u in JSON at position 0
What does that even mean? I bit of searching and I ran across this Stack Overflow question. So it seems Xrm.WebApi is looking for a variable which maps entity names with their corresponding entityset names. Easy fix since I had all the data so I dynamically built a variable with all the mappings which looked a bit like this (you only need to add the entities you're working with):
window["ENTITY_SET_NAMES"] = ['{"account":"accounts", "contact":"contacts"}'];Got further along and started working implementing actions and functions and ran into the same error once again, WTF. After some tedious debugging through the Microsoft code I found there is another dependency on a similar variable. This one maps entities to their primary id fields. So I added something like this with all these mappings:window["ENTITY_PRIMARY_KEYS"] = ['{"account":"accountid", "contact":"contactid"}'];After that my problems were solved.↧
Dynamics 365 Trial
Hi,
Hopefully someone can help - I have registered for a Dynamics 365 trial version - I was hoping to explore creating workflows etc - but I am not an administrator so can't do this. When I try to update my user it fails. Can anyone help.
thanks
Steven
↧
How to extend the timeout on preview when hovering over fields in IE11?
Is there any way to extend the period a field's contents (ie not Label/Description) are displayed on mouseover please? We use CRM 2013 on premises via IE 11. Currently the preview fades after around 5 seconds. I would like to extend this to 30 seconds or even better make it unlimited. I note it is unlimited via Chrome 61. Thanks.
↧