This is going to focus on the Chocolatey package set up and the code used to build updated packages.
A single git repository which contains folders for each package / application / tool.
Each package folder contains the following:
You can choose to change the metadata to whatever you’d like but I’m going using what the original packages contains. Later you’ll see in the code used to update the packages, I’m just reading from the downloaded content and updating the matching elements.
The package <id> you’ll want to change to something unique, at the very least a variant of the original. Assuming you’re running the package update process on the same place as your feed (like Azure DevOps) you might run into an issue where it uses your private feed first to retrieve the package as opposed to the public source you actually intended. I’m guessing that’s by design but the issue I ran into popped up in the script comparing the version in the .nuspec in source control versus the package that is publicly available. Since we aren’t specifying a version (because we won’t really know what it will be once this process is automated) it’s pulling back the first copy it finds based on the registered sources. When the compare happens it sees the same version and aborts because it doesn’t show there’s an update needing to happen.
If you’re going to have the process use the public package for metadata you can get away with filling in any dummy data and after the first pass it will get updated to the real values. If you want to look at what’s there ahead of time you could use this simple PowerShell to retrieve the package metadata.
Be careful of the version numbers as once you’ve pushed to the feed you cannot delete a package, you can only un-list it or publish a new version with a higher version number. If you use your own version numbering scheme it’s probably not as big a deal but more than likely you’ll want to use the same version number as the public package.
Full .nuspec documentation: https://docs.microsoft.com/en-us/nuget/reference/nuspec
This is used in a PowerShell build task and starts off with variables for the public package we’re using as a base and the corresponding file/folder locations in the project.
Next is the version comparison between the latest version of the public package and what is currently in the .nuspec file. The Plug-in Registration Tool is on NuGet so we use NuGet.org as a source. If you’re using a Chocolatey packages as the source then you’ll need to use Chocolatey.org as the source. Using Azure DevOps, NuGet is already registered as a source but Chocolatey is not in which case you’ll need to use Register-PackageSource and target Chocolatey.org (example). Once the comparison is made if the version hasn’t increased then the process stops. Before doing so a Pipeline Variable is set so we can use it to prevent any future build tasks from running. The other thing of note is the <files> section which determines what should be included when the package command is run. In this case we want just the tools folder and the .zip file containing the actual content and we’ll be ignoring the readme file and this PowerShell script file.
Once it’s been determined an update is needed, the public package is downloaded. As part of the process I’m giving it common name that corresponds to a value in the install file. This is solely to have one less thing to change when reusing this code.
From the package used in the version comparison I’m updating the .nuspec in my package. This isn’t a necessity, just more for information purposes. I’m also setting a Pipeline Variable here with the new version number so I can use it in a later build task.
At this point the only thing left is to run the Chocolatey command to create the package from the content of the current directory based on what is defined in the .nuspec file. Chocolatey is installed by default on the Azure DevOps hosted build agents but it you’re running this from anyplace else you’ll need to run the PowerShell command to install it first.
This is used with a NuGet build task to upload the completed package to the feed which is going to host it. Specific to Azure DevOps I’m using a Personal Access Token that has read/write access to Packages to authenticate since the feed isn’t public. Also note that I used the NuGet v2 endpoint as opposed to the newer v3 endpoint. The format looks like this:
https://{InstanceName}.pkgs.visualstudio.com/_packaging/{FeedName}/nuget/v2
Here’s where you’ll run into a 409 error uploading the package if you try to upload a package with a version number that already exists. I’ll cover more about the feed set up in part 3 of this blog.
This is used in a separate PowerShell build task run after publishing. Since I’ve made modifications to the .nuspec file they’ll need to be committed back to source control so the next time this runs the package process won’t run unnecessarily after a version comparison. As part of the comments I’m using the Pipeline Variable I set earlier with the new version number we’re updating to. In the Azure DevOps build you also need to enable to option Allow scripts to access the OAuth token so that we can pass the System.AccessToken variable in the request header to authenticate.
In this case these scripts are very simple. After a user chooses to install a package it’s downloaded to the local machine, at which point chocolateyInstall.ps1 kicks off. The SDK tools aren’t installable applications so “installation” is just a matter of copying the files somewhere. I chose the user’s Application Data folder and am creating a folder structure that will support installing tools from multiple sources. The Chocolatey unzip command will handle extraction and creation of any folders in the destination path that may be required. This is just unzipping my renamed package file I downloaded from the original source. To complete things I using the Chocolatey create shortcut command to make a short cut on the user’s desktop to the folder containing the executables.
When things get installed, Chocolatey is keeping the original package around so it knows what is on the machine to determine if updates are available, do reinstalls, and to access the uninstall script. The location will be similar to: C:\ProgramData\chocolatey\lib\YourPackage
As you might have guessed chocolateyUninstall.ps1 will run when the user chooses to uninstall the package. Since it’s not an installed application I’m just deleting the things I created during the install and deleting the package from the lib folder. There are a number of different Chocolatey commands you could use to uninstall but at the time when I worked on this I couldn’t get the one I believe I was supposed to use to work so I went down this path. For the full list of Chocolatey commands, check out their documentation.
That covers the package creation process. Part 3 will look at the setting up Azure Artifacts & Build Pipeline to keep things continuously updated as well as how to use the new feed in the Chocolatey clients. In case you missed in, part 1 gave an overview of Chocolatey and why you might want to use it in the Dynamics 365 space.
I’ve got everything up on GitHub so you can refer to that incase I don’t end up explaining something clearly enough
https://github.com/jlattimer/D365Chocolatey
Project structure
Each package folder contains the following:
- .nuspec file which provides the metadata about the package
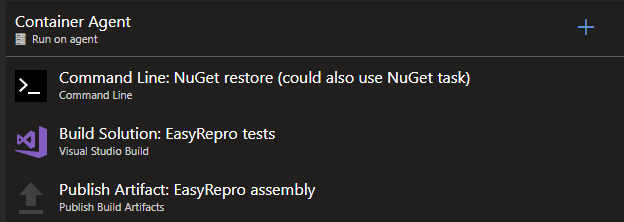
- PowerShell file containing the scripts that will go into the Azure DevOps Build Tasks to:
- Build the updated package
- Push to the NuGet feed
- Commit the updated files back to source control
- Tools folder containing 2 PowerShell files
- chocolateyInstall.ps1 which handles the installation once it’s on the target machine
- chocolateyUninstall.ps1 which handles the uninstallation from the target machine
.nuspec file
You can choose to change the metadata to whatever you’d like but I’m going using what the original packages contains. Later you’ll see in the code used to update the packages, I’m just reading from the downloaded content and updating the matching elements.
The package <id> you’ll want to change to something unique, at the very least a variant of the original. Assuming you’re running the package update process on the same place as your feed (like Azure DevOps) you might run into an issue where it uses your private feed first to retrieve the package as opposed to the public source you actually intended. I’m guessing that’s by design but the issue I ran into popped up in the script comparing the version in the .nuspec in source control versus the package that is publicly available. Since we aren’t specifying a version (because we won’t really know what it will be once this process is automated) it’s pulling back the first copy it finds based on the registered sources. When the compare happens it sees the same version and aborts because it doesn’t show there’s an update needing to happen.
If you’re going to have the process use the public package for metadata you can get away with filling in any dummy data and after the first pass it will get updated to the real values. If you want to look at what’s there ahead of time you could use this simple PowerShell to retrieve the package metadata.
Be careful of the version numbers as once you’ve pushed to the feed you cannot delete a package, you can only un-list it or publish a new version with a higher version number. If you use your own version numbering scheme it’s probably not as big a deal but more than likely you’ll want to use the same version number as the public package.
Full .nuspec documentation: https://docs.microsoft.com/en-us/nuget/reference/nuspec
Package building scripts
Part 1 – building the package
Next is the version comparison between the latest version of the public package and what is currently in the .nuspec file. The Plug-in Registration Tool is on NuGet so we use NuGet.org as a source. If you’re using a Chocolatey packages as the source then you’ll need to use Chocolatey.org as the source. Using Azure DevOps, NuGet is already registered as a source but Chocolatey is not in which case you’ll need to use Register-PackageSource and target Chocolatey.org (example). Once the comparison is made if the version hasn’t increased then the process stops. Before doing so a Pipeline Variable is set so we can use it to prevent any future build tasks from running. The other thing of note is the <files> section which determines what should be included when the package command is run. In this case we want just the tools folder and the .zip file containing the actual content and we’ll be ignoring the readme file and this PowerShell script file.
Once it’s been determined an update is needed, the public package is downloaded. As part of the process I’m giving it common name that corresponds to a value in the install file. This is solely to have one less thing to change when reusing this code.
From the package used in the version comparison I’m updating the .nuspec in my package. This isn’t a necessity, just more for information purposes. I’m also setting a Pipeline Variable here with the new version number so I can use it in a later build task.
At this point the only thing left is to run the Chocolatey command to create the package from the content of the current directory based on what is defined in the .nuspec file. Chocolatey is installed by default on the Azure DevOps hosted build agents but it you’re running this from anyplace else you’ll need to run the PowerShell command to install it first.
Part 2 – publishing the package
https://{InstanceName}.pkgs.visualstudio.com/_packaging/{FeedName}/nuget/v2
Here’s where you’ll run into a 409 error uploading the package if you try to upload a package with a version number that already exists. I’ll cover more about the feed set up in part 3 of this blog.
Part 3 – Committing the changes
Installing & uninstalling
When things get installed, Chocolatey is keeping the original package around so it knows what is on the machine to determine if updates are available, do reinstalls, and to access the uninstall script. The location will be similar to: C:\ProgramData\chocolatey\lib\YourPackage
As you might have guessed chocolateyUninstall.ps1 will run when the user chooses to uninstall the package. Since it’s not an installed application I’m just deleting the things I created during the install and deleting the package from the lib folder. There are a number of different Chocolatey commands you could use to uninstall but at the time when I worked on this I couldn’t get the one I believe I was supposed to use to work so I went down this path. For the full list of Chocolatey commands, check out their documentation.
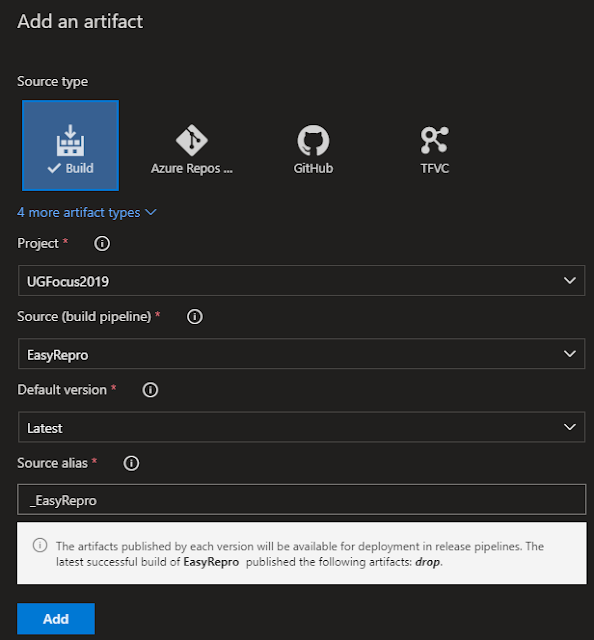
That covers the package creation process. Part 3 will look at the setting up Azure Artifacts & Build Pipeline to keep things continuously updated as well as how to use the new feed in the Chocolatey clients. In case you missed in, part 1 gave an overview of Chocolatey and why you might want to use it in the Dynamics 365 space.
I’ve got everything up on GitHub so you can refer to that incase I don’t end up explaining something clearly enough
https://github.com/jlattimer/D365Chocolatey