I have created Online Dynamics 365 30 days trial version.
I want Client ID and Client Secret Key to call Web API using OAuth 2.0. How to get them?
I have created Online Dynamics 365 30 days trial version.
I want Client ID and Client Secret Key to call Web API using OAuth 2.0. How to get them?
1. I downloaded the Developer extensions and the developer toolkit. (vsix for dynamics)

2. Updated the manifest with the version 15 instead of the 14.
3. Got both installations completed
4. Instead of map the folders installed I mapped the path to the most recent version of dlls.
https://docs.microsoft.com/en-us/dynamics365/customer-engagement/developer/download-tools-nuget


And now I cant make the connection. When I tried to start a new project I get the window that asks if you want to reconnect to crm and it shows my server: organization: and user: do you want to use this connection I click yes and then I get this error:

eq(variables['ContinueUpdate'], 'true')
Can anyone refer me to documentation that shows how to connect an Asp.Net Core App to CRM online?
Things I found based on my research:
Thank you in advance.
Hi all.
I'm facing a Permission error when i try to call an external WebService from my plugin.
Notes:
1. The web service was developed by another company and they said that they could not put a friendly name (dns) for this url
2. The web service is on IP format (http://200.279.18......).
So, for a temporary solution, i did a Windows Scheduler console APP that runs every 1min calling the Web Service and update the Quote entity. But i need this web service executing on real time.
Any help?
I want to make string desc as int desc while using web api query.

ex) string desc -> 2, 10, 1
    int desc -> 10, 2, 1


Query : new_projects?$select=new_dt_start,new_txt_project_no&$orderby=new_txt_project_no desc

Is there any way?
install-module Microsoft.Xrm.Tooling.Testing
$user = "admin@test.onmicrosoft.com"
$password = "password"
$cred = New-Object System.Management.Automation.PSCredential `
     ($user, (ConvertTo-SecureString $password –ASPlainText –Force))
 $apiUrl = "https://admin.services.crm.dynamics.com"
$orgId = '38600bb5-ed48-47e4-8844-e05c5516b446'
$orgUniqueName = 'org1a1aa611'
 # Test Suite
$testSuiteName = 'IntegrationTests'
$testSuiteUrl = 'https://mystorage.blob.core.windows.net/test/AutoTest1.zip?sv=SASKEY'
$testUserCredential = $cred
$completionCallbackUrl = 'https://prod-03.westus.logic.azure.com:443/workflows/...'
 # Test trigger
$testTriggerName = 'IntegrationTests-OrganizationPackageInstall'
$testTriggerType = 'OrganizationPackageInstall'

Register-TestSuite -ApiUrl $apiUrl -OrganizationId $orgId -OrganizationUniqueName $orgUniqueName `
     -TestSuiteName $testSuiteName -TestSuiteUrl $testSuiteUrl -TestUserCredential $testUserCredential `
-ApiCredential $cred -CompletionCallbackUrl $completionCallbackUrlRegister-TestTrigger -ApiUrl $apiUrl -OrganizationId $orgId -TestSuiteName $testSuiteName `
-TestTriggerName $testTriggerName -TestTriggerType $testTriggerType -ApiCredential $credGet-TestSuites -ApiUrl $apiUrl -OrganizationId $orgId -ApiCredential $credStart-TestRun -ApiUrl $apiUrl -OrganizationId $orgId -TestSuiteName $testSuiteName `
-ApiCredential $cred
$testRunId = '2c5d1e62-ff35-43c3-9681-83de5fbb2235'
Get-TestRun -ApiUrl $apiUrl -OrganizationId $orgId -TestRunId $testRunId `
-TestSuiteName $testSuiteName -ApiCredential $credhttps://{your instance}.visualstudio.com/{project name}/_apis/build/builds?api-version=5.0Content-Type: application/jsonBasic{anything}{Azure DevOps Personal Access Token}{
"definition": {
"id": {build definition id}
}
}| Hosted VS2017 Agent | |
| Task | Time |
| Queue time | 1s |
| Prepare job | <1s |
| Initialize agent | <1s |
| Initialize job | 7s |
| Checkout | 14s |
| NuGet Restore | 1m 7s |
| MSBuild - Build Solution | 54s |
| Visual Studio Test Platform Installer | 8s |
| VsTest – Execute Unit Tests | 35s |
| Publish – Test Results | 5s |
| Post-job: Checkout | <1s |
| Report build status | <1s |
| Total | 3m 14s |
| Private Agent Azure Container Service | |
| Task | Time |
| Queue time | 1s |
| Prepare job | <1s |
| Initialize agent | N/A |
| Initialize job | <1s |
| Checkout | 3s |
| Command Line Script - NuGet Restore | 4s |
| MSBuild - Build Solution | 8s |
| Visual Studio Test Platform Installer | 2s |
| VsTest – Execute Unit Tests | 14s |
| Publish – Test Results | 4s |
| Post-job: Checkout | <1s |
| Report build status | <1s |
| Total | 38s |
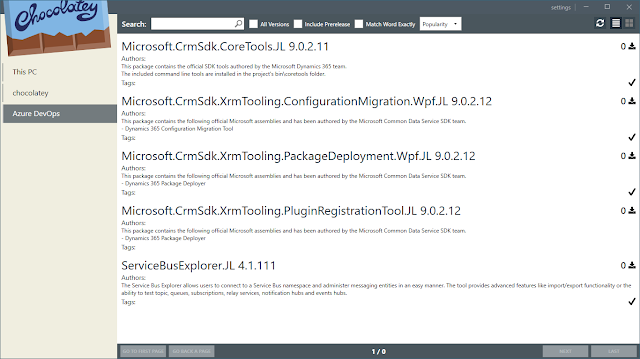
docker build -t d365agent:v1.1 -m 2GB .docker build –no-cache -t d365agent:v1.1 -m 2GB .docker run -it -d --restart always --name "d365agent" --hostname "d365agent" d365agent:v1.1docker start d365agentdocker stop d365agentdocker exec -it d365agent powershelldocker login MyRegistry.azurecr.io -u MyRegistry -p AccessKeydocker tag d365agent:v1.1 MyRegistry.azurecr.io/d365/d365agent:v1.1docker push MyRegistry.azurecr.io/d365/d365agent:v1.1Someone might find this useful if trying to move solutions around using Azure DevOps & PowerShell. I wanted to automate export of the latest solution patch using the Microsoft.Xrm.Data.Powershell library as part of a build pipeline. It’s pretty straightforward but it requires the solution name, simple for the base solution but when dealing with a patch it’s not possible to predict what the name is going be in order to build it into your script.
I came up with this. Given a solution uniquename this sets build variables for the uniquename & version of the latest patch of a solution or the base solution's uniquename & version if no patches exist.
I have created Online Dynamics 365 30 days trial version.
I want Client ID and Client Secret Key to call Web API using OAuth 2.0. How to get them?
1. I downloaded the Developer extensions and the developer toolkit. (vsix for dynamics)
2. Updated the manifest with the version 15 instead of the 14.
3. Got both installations completed
4. Instead of map the folders installed I mapped the path to the most recent version of dlls.
https://docs.microsoft.com/en-us/dynamics365/customer-engagement/developer/download-tools-nuget
And now I cant make the connection. When I tried to start a new project I get the window that asks if you want to reconnect to crm and it shows my server: organization: and user: do you want to use this connection I click yes and then I get this error:
eq(variables['ContinueUpdate'], 'true')
Can anyone refer me to documentation that shows how to connect an Asp.Net Core App to CRM online?
Things I found based on my research:
Thank you in advance.